.
Showing posts with label simple projects. Show all posts

Sunday, March 27, 2011

coffee filter lamp shade

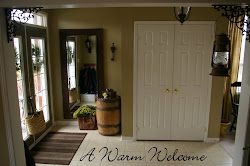
There once was a lampshade that could. 
Then one day the lampshade just couldn't anymore. 
Until now....

Honestly?!  Coffee filters..who knew?
I would love to take credit for this amazing diy project..but while clickety click clicking away from one crazy talented blogger to another to another and another...I found the most gorgeous lampshade made of coffee filters that was crafted by Sarah at Northwest Hospitality. 

Hmmmm a coffee filter lampshade...how very interestingly beautiful....and I  HAVE ALL THE SUPPLIES ON HAND!  My shade wasn't a drum, like Sarah's, but I decided I had nothing to lose..and the coffee filter extravaganza began.

What you need:
lampshade
hot glue
coffee filters (bulk from Costco)
wine for the friend who gets suckered into folding : ) {thanks 'C'}

1.  fold coffee filter in half
2.  fold in half again
3.  fold in half again
4.  fold point up and add a spot of hot glue
Continue this process and glue folded filters to lampshade until full.

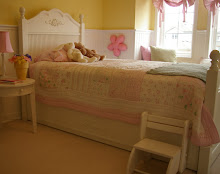
I would like to add that this process really DOUBLES the size of your shade.  I had started out with the lamp below... 


and when the shade was completed...the size no longer looked appropriate on it's base.  Luckily I had another lamp in the house that I swapped out the base for.  I gave it a quick paint job and some distressing and am super happy with the results.

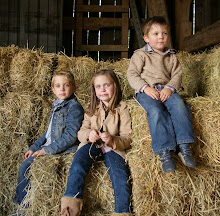
It really does give all the most wondrous glow at night.    I have another lampshade to revamp in Ava's room.  But this time I'm going to try ruffles.  Wanna see what I mean?  Take a stroll on over to see a gal by the name of Jennifer from Dear Lillie...but be forewarned..have a potty break first because you WILL be there for a very very very long time!  Seriously this chicky has more talent in her baby finger than I could ever dream of.

Also, if you would like a much more detailed tutorial on the coffee filter lampshade and many more inspiring ideas...please visit Northwest Hospitality.


Have a great week everyone!


Saturday, December 18, 2010

homemade notepads

The kids wanted to make their teachers a little gift this year.  So I searched online for something that was practical, affordable and meaningful....homemade personalized notepads

I'm not sure what's been going through my mind lately, but I've gotten some really cool ideas from other blogs and have completely forgotten to jot down the actual site...so please if you've seen this around, let me know so that I can give credit where credit is due!

And I also realize this is coming to you AFTER school is out for the holidays...but the kids now want to make some for their friends too...BEST FRIENDS A & L etc....get creative and personalize it how you'd like! 

Here we go:

1. Find a font {for the teachers...mine is Life Lessons from DaFont}.

2. In WordPerfect, I typed "A note from Mrs. Teacher" and fit it 4 times to one sheet of regular printer paper.  I printed this out 5 times all together to make the notepad 20 pages. 

3. Fold the paper perfectly in half one way, open and fold in half the other way.  I made tiny pencil marks on the end of each fold to line up on my cutter. 

4. Place folded sheet on top of all your pages and carefully use your cutter to divide the paper into 4 equal pieces that will make up the notepad.                      


5. I had pretty cardstock from my "wannabe scrapbooking" days, so I also cut a front and back to make the notepad a little sturdier.


6. Next, assemble your notepad together. Use butterfly clips to keep everything together for glueing...oh and VERY IMPORTANT...be sure to use a piece of scrap paper {mine are old recipe cards} on either side so as not to get glue on your finished booklet.


7. Once your booklet is secured, apply Rubber Cement {Michaels $5}  across the top.  The scrap paper will allow you to not worry about any overglueing mess.  Apply a few coats, allowing for drying time in between.

8. Lastly, the kids were each given a white piece of cardstock cut out slightly smaller than the front cover to make their title page.  Use mounting adhesives, or double sided tape to stick title page onto finished notepad.  


I thought they turned out really sweet!  and I was very surprised how easy it was to use the rubber cement.  I just hope they hold up and don't fall apart! : )


I was just thinking...maybe I should make one up for my husband to take to work and have it read "Stacey rocks my world" hahhaha! 

enjoy your holidays


Sunday, July 25, 2010

off my rocker

Some things you just can't part with...no matter what. So... you make the best of it.

Meet the rocker. Back when my husband was single and in his early 20's, this rocker was one of his first purchases he made when he moved to his own place {insert record scratch noise here} WHAT?? Why the heck would a young man with no female ties buy a rocking chair? No idea...he doesn't even know why he bought it.

But it served it's purpose well. I used this ugly orange wood toned rocking chair to soothe all 3 of my babies. And when I was in between babies, I borrowed it out to a friend to do the same. So as much as I really never cared for the chair, there are just way too many special bonding mommy moments for me to part with it.

Chair meets paint...and a little hello from sandpaper too.


I've now a new fondness for this chair, I only wish I would have painted it years ago.
Take a closer look at what you have....before you get rid of something with sentimental value, think facelift first.


Sunday, June 27, 2010

burlap pillow

I have been soooooo inspired by sooooo many blogs and their burlap pillows! I decided today, after ironing for two hours straight {sigh} that I needed to get a project done that would make me smile. And so I blew off the dust on my 1958 Singer sewer, which is actually the night table in the above photo, and put my straight line only sewing skills to work.

This is the before pillow. It's actually a pillow from my living room set. I was never a fan of these pillows and my plan is to eventually cover them all.

With some left over burlap from other projects, I sewed three edges of my new pillowcase, and placed the old pillow in it's entirety inside. Then I sewed the fourth edge closed right along the old pillow edge with the sewing machine. I will fold over the last outter edge and sew a button for detail. This is probably not the correct pillow making method..but it worked out well for me.

Since I was free handing the writing on the pillow, I did a few practice numbers and letters on a scrap piece of burlap. Breathing deep, I went for it, and am quite happy with the result. Why the number 60? It's our street address. The stripes were made using the measuring stick.

Initially I made this pillow to go back to it's original home on my living room sofa, but instead I think I really like it in my bedroom.

I've always been a little timid with the sewing machine. I think I have a secret fear of ruining fabric, so I pine over all the beautiful things that I think should be simple to make and that I'd love to make, but never take the plunge to try. It also doesn't help that my old sewing machine can't decide whether it wants to sew fabric or eat it! But I DID IT!
As Nike says "just do it". I'm trying to instill that into many aspects of my life. I'm tired of complaining of the things in life I'd like to do. Time to break free and instead of "just talking".... I'm "just doing".

Cheers to doing it ... did I just say that right now? oh yes I did!

Hope you had a wonderful weekend!

Tuesday, April 27, 2010

doorknob makeover

Simple things can be forgotten when buying a builder home...like the fact that the contractors search high and low for the cheapest of the cheap when it comes to installing light fixtures and doorknobs in our homes. I think the brass doorknob comes in at a whopping $5.49 in most Canadian hardware stores, compared to a decent black knob ringing in around $35.00 and up.

I can't walk by a door in my home without hearing that pshyco music (wweeh wweeh wweeh) as I see my head reflected back at me in the most unusual of bubbly shapes. And even though yesterday I was feeling the onset of a certain cold coming on...those knobs were going to meet their maker! I was in a shopping mood, and yet something must have been drastically wrong with me because after dragging a girlfriend round store after store to find who knows what, I came only with only flat black spray paint and birthday invitations. It was a proud day for Mr. vG. And the doorknob makeover begins...

Meet the enemy...


I put a screw through a piece of plywood to hold up the knobs of this sort, and then sprayed around them. I sprayed a coat of primer and then continued on with two coats of the black Rustoleum Painters' Touch in matte finish.

Mr. vG came home in the middle of my project and was quite impressed with my layout of knobs. But of course, had something to say. He thought that the primer was a good step to ensure a better adhersion of the paint, however, if you want to take it one step further, he suggests sanding lightly with a ultra high grade sanding paper, one that won't leave scratch marks and then priming and painting. Urgh. Well, I quit at my six knobs then...only 32 more to go tomorrow when I pick up some sand paper. So many knobs...

Here's a peek of the before and afters:


Oh and I've not looked around in blogland to see if someone has tried this already, so I don't know the success rate of how well the paint holds up. I will give it a couple of weeks for my three children to abuse them and let you all know. Until then...have yourself a wonderful week!

PS In the pictures, I haven't done the hinges yet...but they will come next let me assure you! My brassy days are numbered! : )


DIY Day @ ASPTL

Monday, April 26, 2010

Pretty DIY Vases


Pretty painted vases...what a simply lovely idea. Watch Stephanie White, from House and Home, as she transforms clear vases, jars and plates into works of art with only paint?! Pretty DIY vases ~ tutorial.

And to make it even more cost effective, I've recently learned a paint tip from Janice at Canadian Cottage. She suggests pouring a bit of basic white paint into a yogurt container and mixing it with small amounts of coloured dollar store craft paint until you achieve your colour of choice. How great is that??


Saturday, March 27, 2010

DYI ~ Ideas

There are just so many ideas on "Do It Yourself" projects out there! I thought I'd share a few with you from some very talented women. I know they inspire me to get creative.


DYI ~ Mason Jar Candles

Pottery Barn

See tutorial @ domestically speaking


Quilted Coaster

See Cheryl @ APretty Cool Life for full tutorial!


DYI ~ Cloche

A candle stick and a cheese dome


transforms into this beautiful cloche

See the House of Hepworths for tutorial.


Armoire Make-over

Before


After


The multi coloured stripes make this armoire upbeat and fun!

Tuesday, March 23, 2010

Burlap Picture Frame

I have some left over burlap from my tablecloth and I was thinking about all the things that I could possibly do with it?! I had these pink velour frames from Ava's room that never did make it up on her wall. They've been stacked in her closet now for about 4 years. So I thought..hmmm maybe they'd look good in burlap?

See this is why I love blogging, not that anyone is actually reading this...hello, anybody there, but 4 years..really? It only took me 4 years and a blog to do this!

If you look closely you'll see screw marks that are permantly there! Cover that bad boy up!
If you'd like to make one too:
  • Cut out burlap to fit over your frame
  • Place the frame on your burlap and trace out the center of the frame with a permanent marker pen
  • To make your corners nice, cut in the middle up to your angle (see pic below)

  • When cutting out the extra burlap in the center, don't cut exactly on your marked line...be sure to cut below it so you have enough burlap to hot glue to the inside of your frame
  • Continue to hot glue the outside of your frame, pulling snuggly

  • For the outside corners, I cut again on the angle, and then snipped them to a 90 degrees, fold over and hot glue (pics above and below)
and here you have it..one burlap covered frame...that's me holding my sister when we were younger...and YES I KNOW I look like "throw mama from the train!"

The little flower is left over burlap pieces that I cut into circles and crumpled up, ribbon and a button. I really really thought this was a super easy effort project. Burlap is my friend, oh and I can't forget to credit the hot glue!

Caution: many a fingertip was burned in the making of this frame : )